
Have you ever looked at a high-street clothing rack and wished you could make something that actually fits your unique shape perfectly? That is the magic of dressmaking.
If you are completely new to sewing, the sheer volume of tools, haberdashery and fabrics on the market can feel a bit overwhelming. To help you sort the essentials from the extras, Jen from the Sewing Street planning team – who brings over 20 years of expertise in sewing, dressmaking and pattern cutting – has broken down exactly what you need to kickstart your journey. You can also watch Jen run through what you need to get started on the Sewing Street Tutorials YouTube channel.
1. The Machine: What to Look For
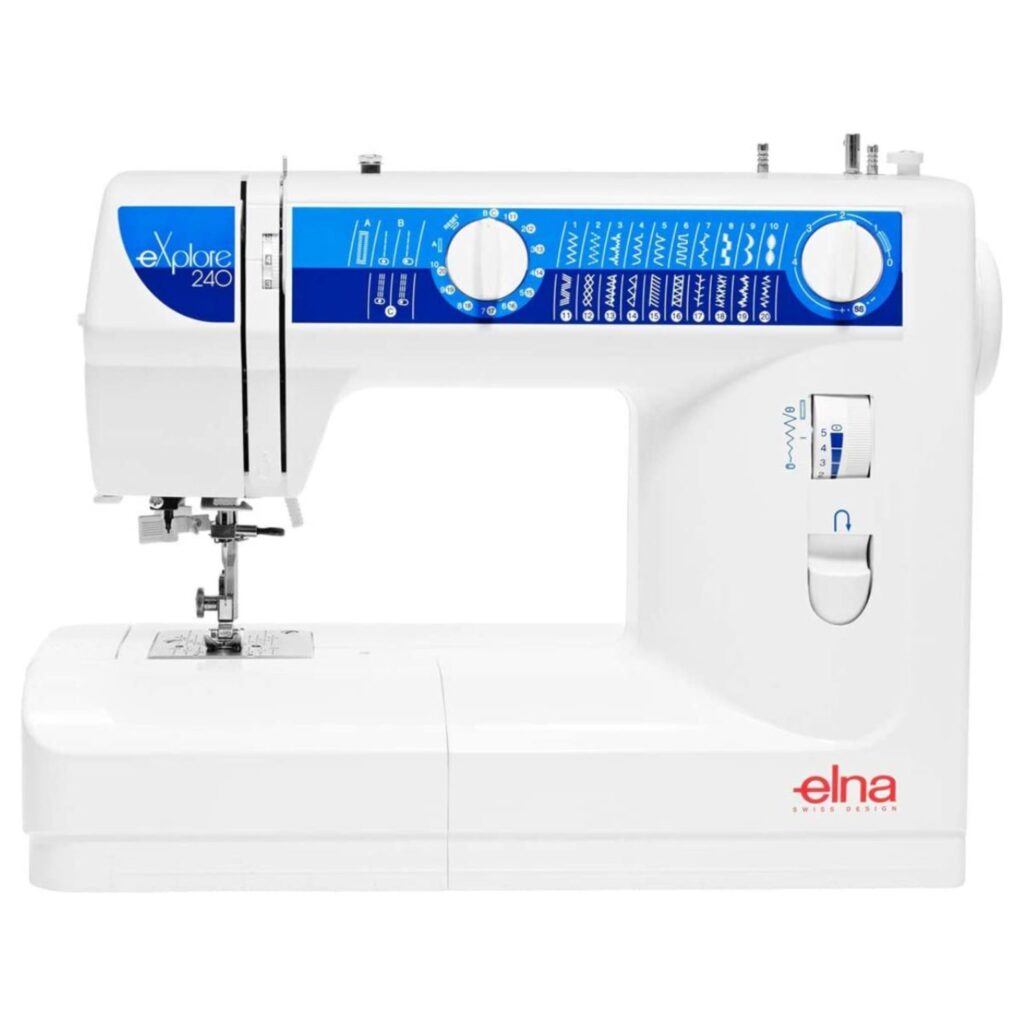
You do not need a massively expensive, top-tier industrial machine to sew your own clothes. A brilliant beginner entry-level machine – like the Elna 240 featured on Sewing Street – is great to start with.
When you are assessing a machine for dressmaking, do not get bogged down by dozens of fancy decorative stitches. You only need to focus on two core essentials:
- The Straight Stitch: For constructing your main seams.
- The Zigzag Stitch: For finishing raw edges to prevent them from fraying.
Handy Machine Features for Beginners
- Measurements on the Needle Plate: Look for a machine that displays both centimetres and inches. This makes it incredibly easy to line up your fabric and maintain an accurate seam allowance.
- A Front-Loading Metal Bobbin: Traditional machines with internal metal components tend to be highly durable, meaning they will easily take you from your very first stitches to more advanced projects.
- An Extension Table: Being able to slide off a section of your machine’s base reveals a “free arm.” This is vital for slipping narrow pieces like sleeves or trouser legs under the needle without accidentally sewing them shut.
Jen’s Top Maintenance Tip: Always turn your machine’s flywheel towards you. If there is one golden rule to look after your machine and avoid nesting threads, this is it!
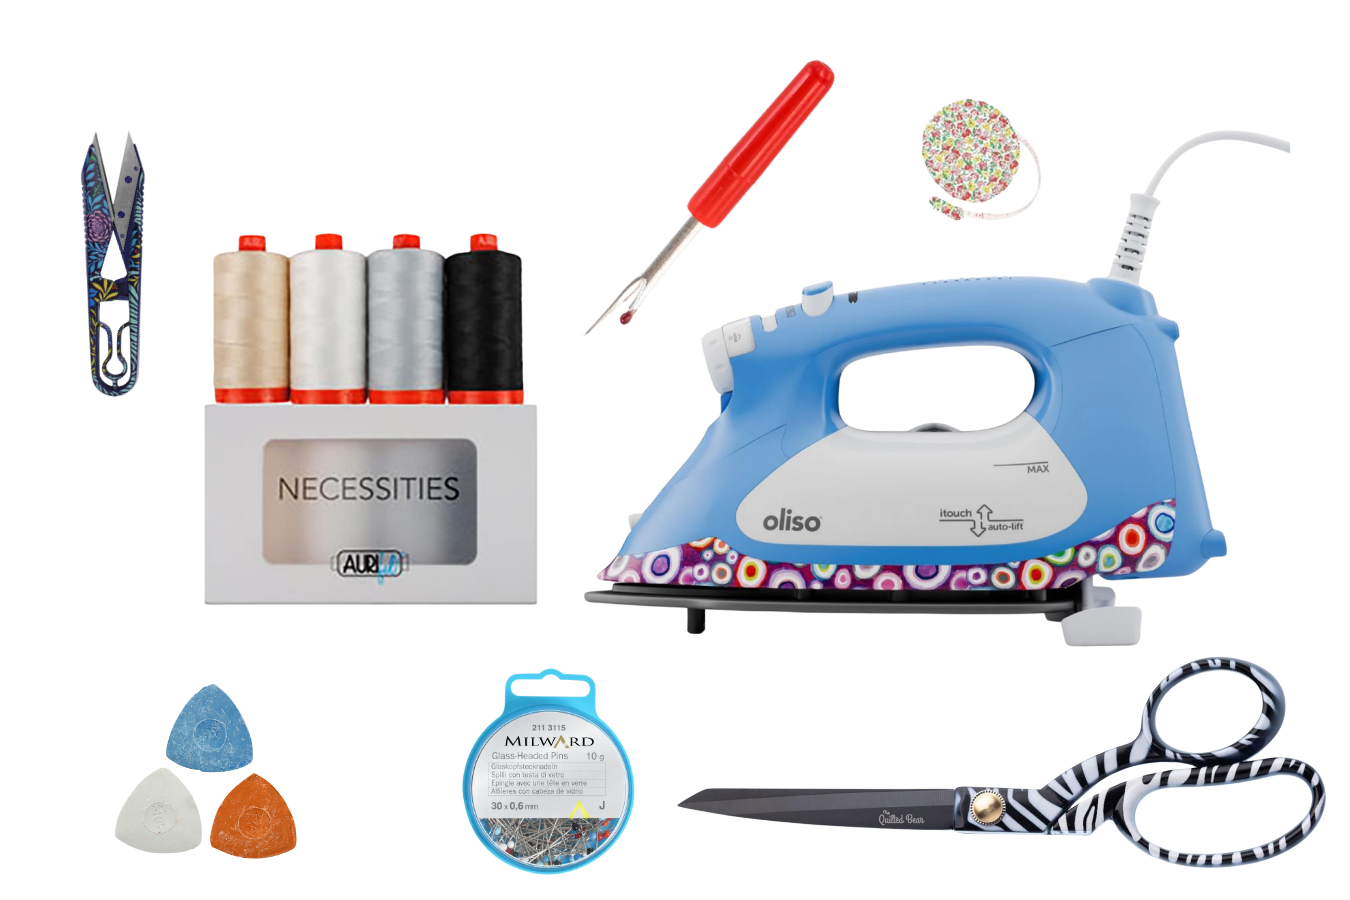
2. Your Essential Dressmaking Toolkit

Before you run out and buy every haberdashery gadget available, stick to these core, beginner-friendly tools that will cover almost every basic garment project.
- Fabric Shears: Invest in a proper pair of fabric scissors (with at least a 5 to 6-inch blade) and keep them for fabric only. Cutting paper or card with them will blunt the blades instantly, ruining your fabric edges later.
- Tailor’s Chalk: Vital for marking notches, dart points, and pivot marks onto your fabric. Chalk is ideal because it is easily brushed away or washed out once your garment is assembled.
- Quality Thread: A multi-colour value pack is a brilliant way to build a stash so you can match threads to future projects, though a basic spool of black or white will get you through your initial practice.
- A Tape Measure: Essential for taking accurate body measurements. Bonus tip: look for one with a magnet on the casing—it is a lifesaver for picking up dropped pins!
- A Seam Ripper (Unpicker): Do not be discouraged by having to use this! Mistakes are an entirely normal, healthy part of learning to sew. Some unpickers even come with a built-in light, which is fantastic for saving your eyesight when picking out dark threads.
- Dressmaking Pins: Glass-headed pins are highly recommended because they are bright, easy to see against your fabric, and simple to grip as you feed your work through the machine.
- Thread Snips: Keep a small pair of spring-loaded snips right next to your sewing machine to cleanly clip your thread tails after every seam.
- An Iron: Never skip pressing! Whether it is a standard household iron or a compact travel iron, pressing your seams open as you sew elevates your work from looking “home-made” to professionally “handmade.”
3. Understanding Fabric: The Good, the Bad and the Grain
Fabric choice can make or break your first sewing project. As a beginner, your main goal is to look for stable, woven fabrics that do not slide around or stretch while you try to cut and sew them.
Best Fabrics for Beginners
- Calico: This is an un-dyed, un-processed plain cotton with a beautiful natural texture. It is highly inexpensive and usually comes in a generous 150 cm width. It is the ultimate fabric for practicing stitches and creating a toile (a test mockup of your garment to check the fit before cutting into your nice fabric).
- Plain Craft Cotton: If you have done any quilting, you likely have this in your stash. It is lightweight, completely stable, has no stretch, and looks the same on the front and back, meaning you do not have to worry about print matching.
- Cotton Poplin: Slightly lighter than craft cotton, poplin has a gorgeous, smooth finish and is incredibly reliable to handle under the needle. If you want a pattern, look for a non-directional print so you do not have to worry about your pattern pieces facing upside down.
- Linen-Viscose Blends: Pure viscose can be quite slinky, but a linen-viscose blend offers a lovely “slub” texture (slight raises and divots in the weave) while remaining stable and easy to sew.
- Chambray & Lightweight Denim: Denim in a 4 oz (chambray) or 8 oz weight is brilliant for beginners. It holds its structure perfectly. Just be mindful of heavy denim jackets with many layers, as thick intersections can be tough on standard machines.
- Lightweight Iron-On Interfacing: Always keep a bit of this in your stash. It is fused to the back of fabrics using an iron to add stability to collars, cuffs, buttonholes and pockets.
Fabrics to Avoid for Project No. 1
Steer clear of these tricky textiles until you have a few finished garments under your belt:
- Organza & Chiffon: Completely sheer (meaning all your internal sewing is visible) and incredibly slippery to handle.
- Jersey & Knits: Stretch fabrics require entirely different machine settings, specific stretch needles, and distinct construction techniques.
- Satin & Micro-Satin: While the drape is gorgeous, it will slip and slide all over your cutting table, turning your first cutting experience into a bit of a nightmare.
- Faux Fur & Bouclé: These are very thick, shed fibres everywhere, and usually require complex garment linings and advanced tailoring skills.
4. Crack the Code: Reading Fabric Grain
When you look at a piece of woven fabric, it is defined by three directional lines. Knowing how to spot them ensures your clothes hang correctly and do not warp after washing.
1.Locate the Selvage:
Look at the long, finished outer edges of your fabric. This slightly thicker, textured border often features tiny pinpricks from where it was attached to the loom during manufacturing.
2.Identify the Warp (Grainline):
The warp threads run completely parallel to the selvage edge. These are the strongest, least stretchy threads in the weave. When a commercial pattern shows a long arrow indicating the “grainline,” you must align that arrow perfectly parallel to these warp threads.
3.Identify the Weft:
The weft threads run directly from left to right, perpendicular (at a 90-degree angle) to the selvage. An easy school memory trick: Warp goes up and down, Weft goes from right to left!
4.Spot the Bias:
If you pull a woven fabric along the warp or weft, it will barely budge. However, if you pull it diagonally across the weave at a 45-degree angle, it stretches significantly. This is called the bias. Some advanced pattern pieces are cut on the bias intentionally to give a stiff fabric a beautiful, fluid stretch around the body.
5. Navigating Commercial Sewing Patterns
The modern sewing world is filled with amazing choices, ranging from historic commercial giants like Simplicity to modern independent (“indie”) designers like Merchant and Mills, Emporia, and NH Patterns.
When shopping for your first pattern, look for labels marked “Easy,” “Beginner,” or “Confident Beginner”.
Critical Rules for Pattern Buying
- Ignore High-Street Clothing Sizes: This is the number one trap for new sewists! Commercial clothing sizes do not align with dressmaking patterns. Always measure your bust, waist and hips with your tape measure, and use those exact centimetre measurements on the back of the pattern envelope to choose your size. You may find you need to cut a pattern size that is several numbers higher than what you buy in retail shops—and that is completely normal!
- Check the Fabric Width: Dressmaking fabrics generally come in two standard widths: 115 cm (45″) or 150 cm (60″). Check the back of your pattern envelope carefully; a narrower 115 cm fabric will require you to buy significantly more meterage than a 150 cm fabric to fit all your pattern pieces out.
- Look at the “Notions” List: This tells you every extra item you need to finish the project before you start sewing – such as elastic, bias tape, zips, or buttons.
- Mind the Bust Cup Size: Many standard pattern companies draft their patterns based on a dressmaker’s B or C-cup size. Note that a dressmaking cup size is calculated by the difference between your high bust and full bust measurements – it is not the same as your bra size! Many indie companies now offer split size ranges (e.g., a smaller range drafted for a B-cup and a larger range drafted for a D/E-cup) to save you from having to do complex pattern adjustments.
Printed Patterns vs. Digital Downloads (PDFs)
You can buy patterns in two formats depending on how quickly you want to start:
| Pattern Type | Pros | Cons |
| Printed Copy | Comes on traditional large-scale format paper or translucent tissue paper; ready to cut immediately. | You have to wait for postage or visit a shop; tissue can tear easily. |
| Digital Download (PDF) | Instant gratification! Buy online, download instantly, and print at home on standard A4 paper. | Requires you to tile, trim, and tape dozens of A4 pages together like a jigsaw puzzle before cutting out your pieces. |
Watch Jen talk you through what you need and even more dressmaking tips on the Sewing Street Tutorials YouTube channel.